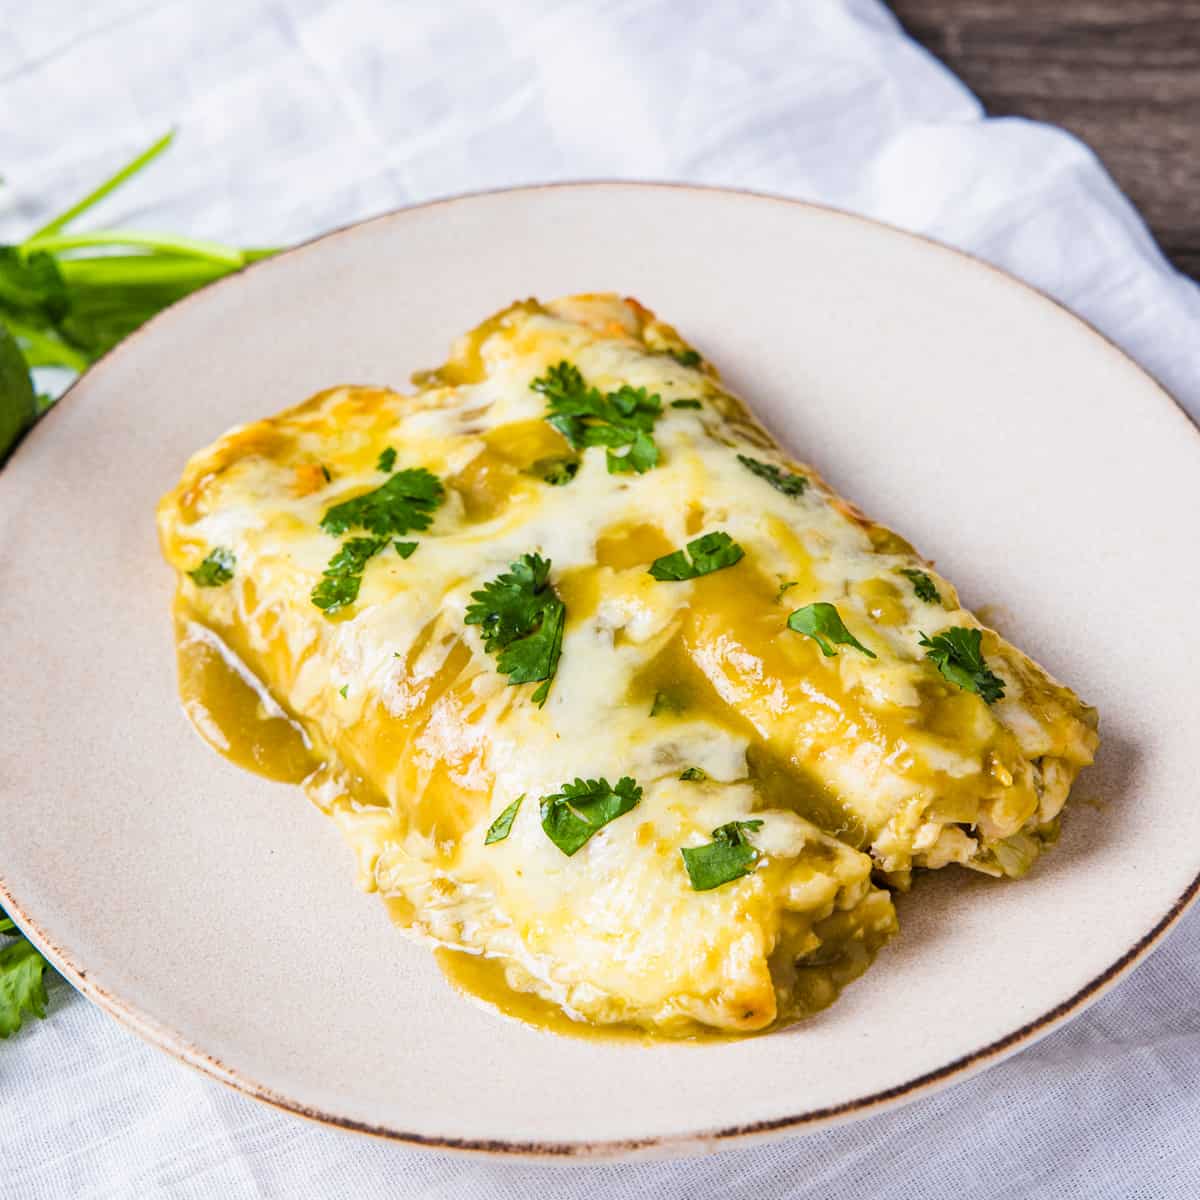
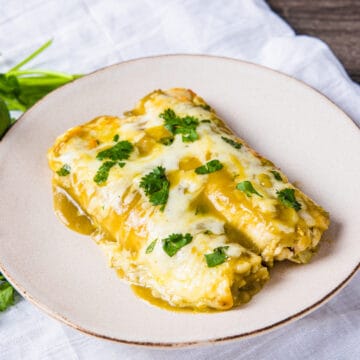
These chicken enchiladas with green sauce feature a creamy shredded chicken and green chile filling covered in a green enchilada sauce and plenty of melted cheese. It's an easy weeknight meal the whole family will love, in just 35 minutes!
Jump to:
What are enchiladas with green sauce?
Green enchiladas, also known as enchiladas verdes, are made with a sauce called salsa verde. In New Mexico the sauce uses primarily green chili peppers. Mild varieties often use poblano or hatch peppers and spicier varieties usually add in serrano or jalapeño peppers. Many store bought green enchilada sauces are this style.
The flavor of green enchilada sauce is brighter and less smoky than red enchilada sauce, or salsa roja, like the one I use in my cheesy chicken enchilada recipe.
Traditional Mexican salsa verde recipes are primarily made with tomatillos, which look like small green tomatoes with a papery husk. This style has a tangier flavor than green chili salsa verde. Frontera brand makes a yummy tomatillo enchilada sauce. Either style will work in this dish in equal quantity, so choose your favorite.
Why this recipe works
For this chicken enchilada recipe, I fill the enchiladas with sour cream, shredded cheese, diced green chiles, onion, garlic, and a little bit of green chile sauce to make a flavorful, creamy chicken enchilada filling.
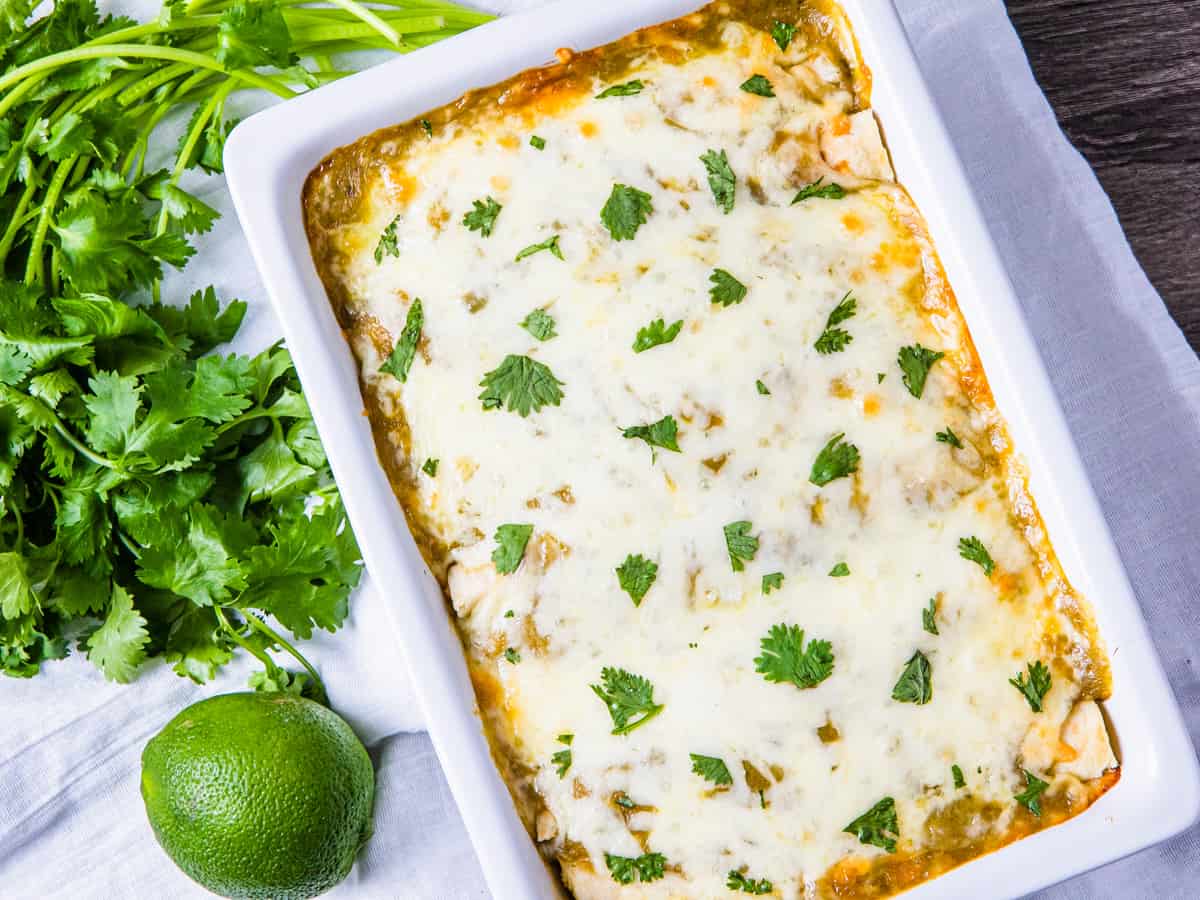
Then, I top off the assembled enchiladas with green sauce and shredded cheese. From there, it's just a quick 20-minute bake in the oven, and they're done.
Pair them with some homemade guacamole, pico de gallo, and Spanish rice, and you'll feel like you're at your favorite Mexican restaurant right in your own home!
Ingredients
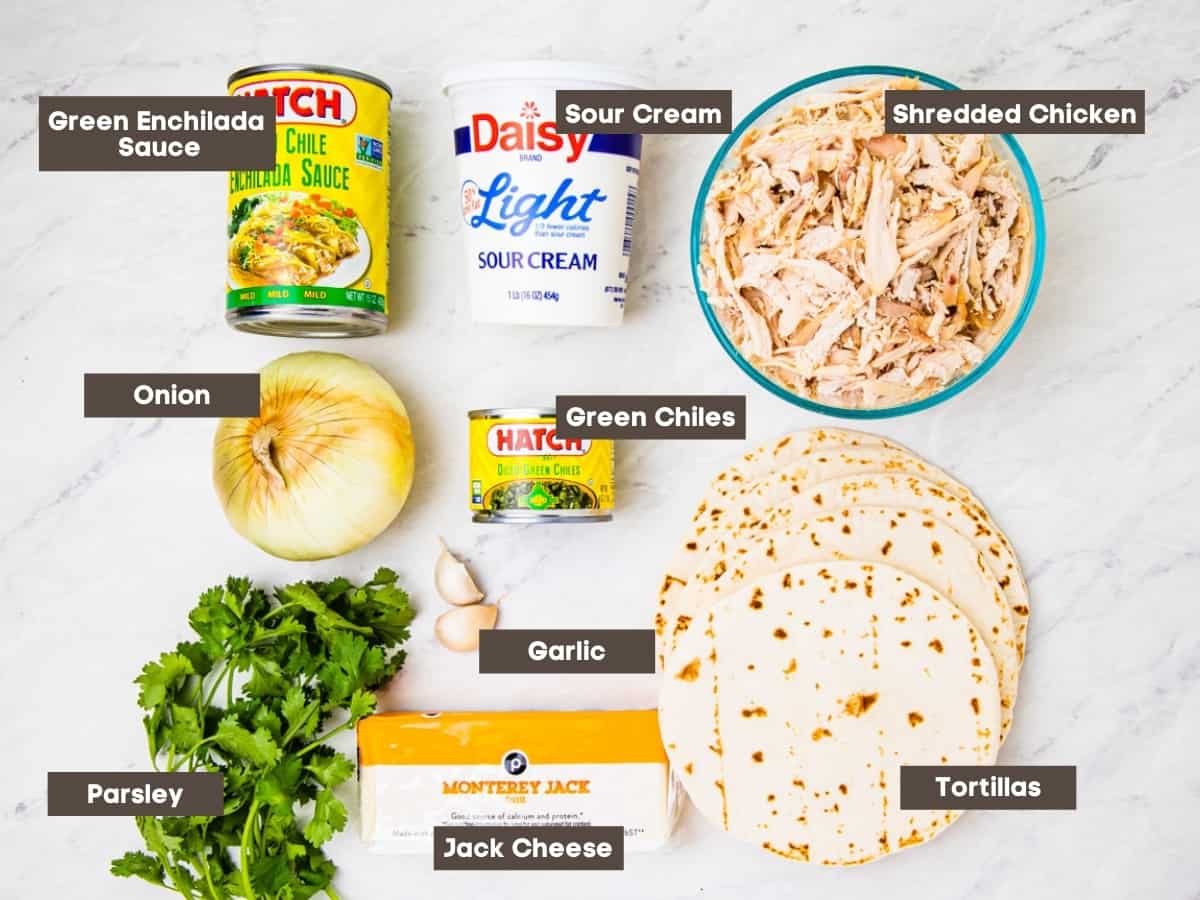
- Green Enchilada Sauce - To keep this green enchilada recipe quick and easy, I used canned Hatch enchilada sauce. I've also used Las Palmas enchilada sauce and La Victoria enchilada sauce in this recipe with similar results. Here's an easy recipe for homemade green enchilada sauce if you want to make your own!
- Diced Green Chiles - When buying canned enchilada sauce and diced green chiles, pay attention to the heat level indicated on the label. They can range from mild to hot, so choose your preference based on how spicy you like your enchiladas.
- Shredded Chicken - I also use shredded rotisserie chicken to keep things simple. Instant Pot shredded chicken or leftover chicken work great too. For a different meat option, try pork enchiladas with green sauce using my Instant Pot pork carnitas in place of the chicken.
- Cheese - I recommend shredding your own cheese from a block for this recipe. Jack and Colby Jack cheeses are my favorites for this dish.
- Sour Cream - This makes the filling creamy and so yummy! You can use full fat or light sour cream. You can even swap in yogurt in this recipe if you prefer. And if you want to make dairy free enchiladas, you can make these enchiladas without sour cream and cheese all together.
- Tortillas - Corn tortillas are more traditional, but I prefer flour tortillas in this recipe. They get soft and gooey while baking and almost melt in your mouth. If you prefer corn tortillas, you'll need to soften them before filling by either; heating in a lightly oiled sauté pan until lightly browned, or by heating the enchilada sauce in a pot and dunking the tortilla in the warm sauce for 5-10 seconds just before filling it.
See the recipe card at the bottom of this post for the complete list of ingredients and measurements.
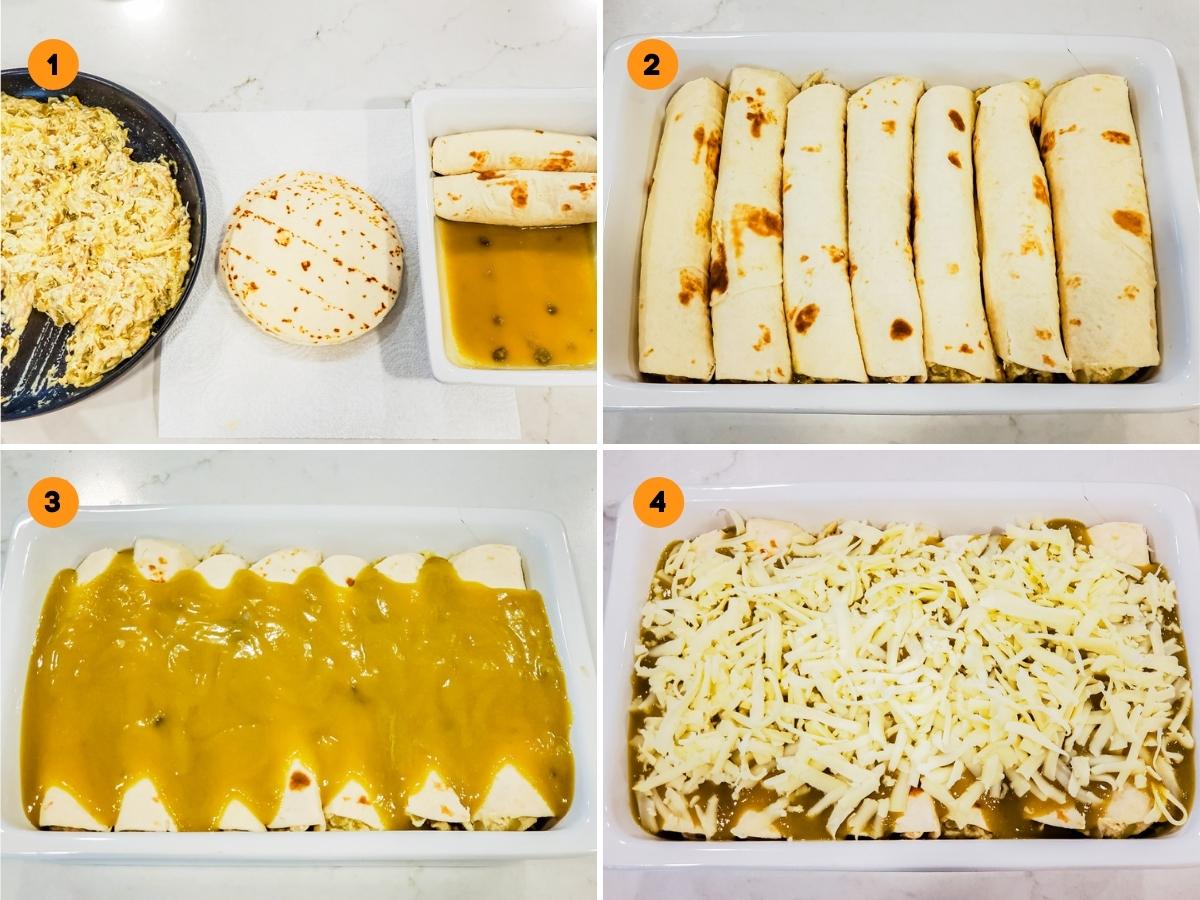
How to make the enchilada filling
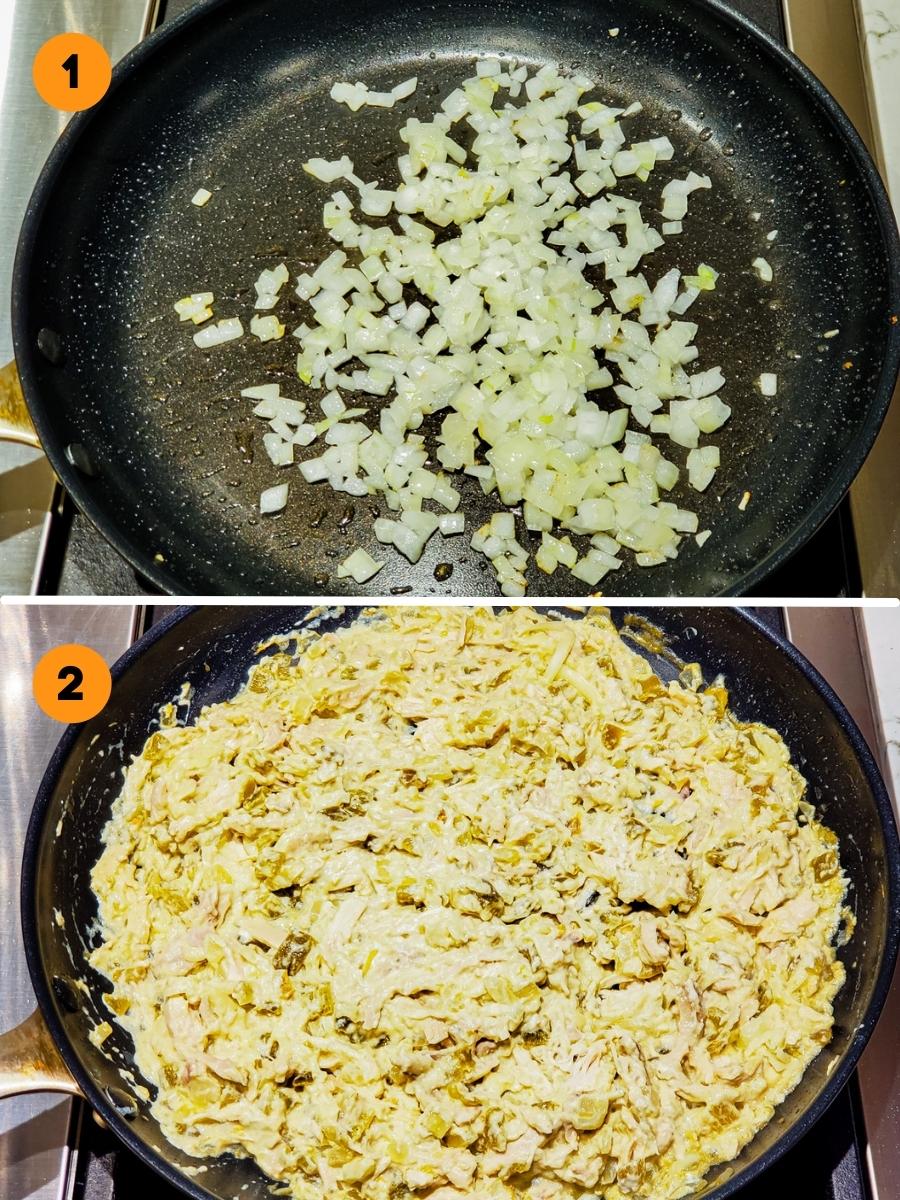
- Heat a large skillet over medium heat, then add 1 tablespoon of olive oil. Add the diced onion and cook for 3-4 minutes, stirring occasionally, until softened. Add the garlic and cook for another 30-45 seconds, then turn off the heat.
- Add ¼ cup of the enchilada sauce, can of diced green chiles, shredded chicken, ½ cup of cheese, and sour cream to the pan and stir to combine.
How to assemble the enchiladas
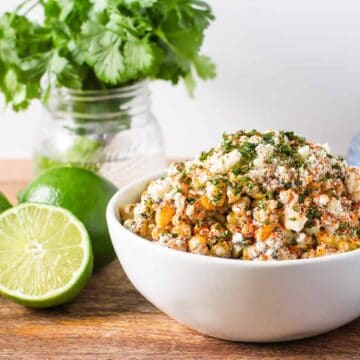
- Set up an assembly line with the filling, tortillas, and your baking dish. Add a little of the green sauce to the baking dish to just coat the bottom.
- Fill each tortilla with around ⅓ cup of the chicken mixture, then roll the tortilla up and place in the baking dish with the seam-side down. Repeat with the remaining tortillas.
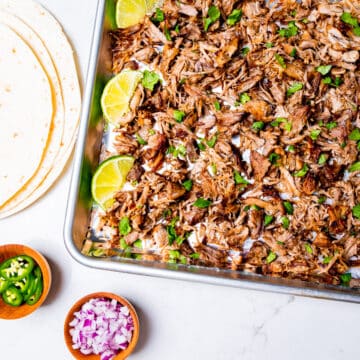
- Pour the remaining enchilada sauce over top of the enchiladas.
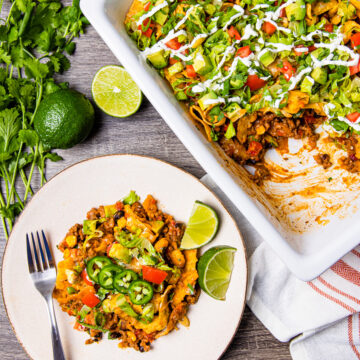
- Top with the remaining cheese and place in a 375ºF oven for around 20-25 minutes until the cheese is melted and the sauce is bubbling.
Expert Tips
- Shred your cheese from a block for the best melt. The additives in pre-shredded cheese can prevent proper melting.
- If your tortillas are tearing when you roll the enchiladas, cover them with a damp paper towel and heat in the microwave for 20-30 seconds to soften them.
- Store leftovers in an airtight container and refrigerate for up to 4 days.
- Reheat in a 325°F oven until warmed through or heat smaller portions in the microwave.
Frequently Asked Questions
You can make these a day ahead and store in the fridge, but wait to add the sauce and cheese on top until just before baking.
Corn tortillas work great in this recipe too! You'll need to soften them before filling so they are more pliable. To do this heat in a lightly oiled sauté pan until lightly browned. Or heat the enchilada sauce in a pot and dip the tortilla in the warm sauce for 5-10 seconds just before filling it. Tongs work best for the dipping method.
These do freeze well too! I often make a double batch and put one in an aluminum pan to freeze. For freezing, prepare as directed, but do not bake them. Instead cover with foil and place the covered dish in a freezer bag. Freeze for up to 2 months.
When ready to use, let thaw overnight in the refrigerator. then bake as directed adding another 5-10 minutes of baking time.
Canned enchilada sauce typically comes in different heat levels, as do the diced green chiles in the filling. For spicy green enchiladas, choose hot varieties. For additional heat add in diced jalapeño or serrano peppers when cooking the onion. You can also mix a little hot sauce into the chicken filling for more spice.
More of my favorite Mexican recipes


📖 Recipe
Enchiladas with Green Sauce Recipe
Ingredients
- 1 medium onion, diced
- 2 cloves garlic, minced
- 3 cups cooked shredded chicken
- ¾ cup sour cream
- 1 4 oz can diced green chiles
- 1½ cups shredded monterey jack cheese, divided
- 1 15 oz can green enchilada sauce
- 8 6" tortillas, flour or corn
- 2 Tablespoons chopped cilantro, for garnish
Instructions
- Preheat your oven to 375°F.
- Heat a large skillet over medium heat, then add 1 tablespoon of olive oil. Add the diced onion and cook for 3-4 minutes, stirring occasionally, until softened. Add the garlic and cook for another 30-45 seconds, then turn off the heat.
- Add ¼ cup of the enchilada sauce, can of diced green chiles, shredded chicken, ½ cup of cheese, and sour cream to the pan and stir to combine.
- Set up an assembly line with the prepared filling, tortillas, and your baking dish. Add a thin layer of the green sauce to the baking dish, just enough to coat the bottom.
- Fill each tortilla with around ⅓ cup of the chicken mixture, then roll the tortilla up and place in the baking dish with the seam-side down. Repeat with the remaining tortillas.
- Pour the remaining enchilada sauce over top of the enchiladas.
- Top with the remaining cheese and place in the oven for around 20 minutes, until the cheese is melted and the sauce is bubbling.
Video
Notes
Reheat in a 325°F oven until warmed through or heat smaller portions in the microwave. Freezing: Prepare as directed and place in an aluminum pan, but do not bake them. Instead cover with foil and place in a freezer bag. Freeze for up to 2 months. When ready to use, let thaw overnight in the refrigerator. then bake as directed adding another 5-10 minutes of baking time.
Nutrition
* All nutrition information we provide are estimates based on third party calculators. We encourage you to calculate these on your own for accurate results.

Vicki says
This is delicious! I was looking for a chicken with salsa verde recipe to take to a potluck here in Mexico and found this. Many Mexicans in this area (Baja California Sur) don't like spicy food, so this will be perfect. I made homemade green sauce and added sugar to take away some of the tang and left out the canned chiles. Just heavenly! Thanks so much!
Holly Lounsbury says
I have a ton of flour tortillas to use but they’re 10” flour maybe I could just make massive ones?! Haha
Patricia S. says
Excellent recipe. I added an extra cup of cheese in the filling and 2 tbsp ground black pepper in filling and topped the enchiladas with red pepper flakes on top of cheese 1 TBSP for extra kick. This will be in my house on repeat! Thank you!!
Maida C says
My sister in law gave us left overs and I said wow! That was delicious! Just made some and going to enjoy it for dinner. Really yummy and simple recipe!
Mari says
I am so glad I found your website!! These were "Delicious!" I didn't change a thing and am looking forward to try more of your recipes. Thank you!!